English | Español

Introduction
Preventing mastitis is one of the most cost-effective strategies for maintaining cow health and ensuring high-quality milk production. A well-executed milking routine plays a crucial role in mastitis prevention. Proper hygiene, consistent procedures, and attention to detail during milking are essential to minimize the risk of mastitis. When dairy farm personnel understand the reasons behind best milking practices, they perform their tasks with greater purpose and confidence. This understanding fosters a commitment to continuous improvement, positively impacting both cow health and milk quality.
What is a Milking Routine?
A milking routine is a series of steps performed before, during, and after milking. These procedures are vital for protecting cow health, enhancing milk quality, and ensuring an efficient milking process. The “one size fits all” approach does not apply for milking routines. Milking routines can vary significantly based on several factors, including the type and size of the parlor (e.g., parallel, herringbone, rotary), the number of milking units, the number of milking technicians, the tools and equipment used, and the specific steps and their sequence in the milking process. The best milking routine is one designed for the farm’s specific needs, usually developed collaboratively by the owner or manager and milk quality advisors.
Everyone has an Important Role
Milking routines start in the pens where the cows are housed. Cow handlers play a crucial role in ensuring milk quality by maintaining clean stalls and alleys, and calmly guiding cows to the parlor. Stalls should be clean, dry, comfortable, and regularly maintained. Cleanliness in these areas reduces bacterial exposure to teat ends, lowering the risk of environmental mastitis. Cow cleanliness, especially legs and udder, is a major determinant of both milking efficiency and the development of new intramammary infection. Calm cows enter the milking parlor readily and are less likely to defecate there, setting the stage for a successful milking routine. Read this article titled “The Role of Predictability and Calm Handling in Milk Letdown”.
Milking Procedures: What, Why, and How
The goal is to attach a properly functioning milking unit to teats that are clean, dry, and well-stimulated. Pre-milking preparation requires balancing thoroughness with efficiency to ensure optimal teat hygiene and effective stimulation for milk letdown. A routine that skips stimulation and proceeds directly to attaching the milking unit fails to support proper milk flow and can compromise both udder health and overall milking efficiency. Instead, it is essential to establish and follow a milking routine based on evidence-based practices that promote udder health and maximize productivity. The following table summarizes the recommended milking steps, their importance, and best practices.
| What | Why It Matters | How to Do It |
|---|---|---|
| Handle cows calmly | Reduces stress, promoting better milk letdown. | Use a soft voice and slow movements. Patience and quiet handling make a big difference. |
| Wear clean gloves | Prevents the spread of bacteria, protecting cows and workers. | Ensure gloves are clean—free of manure, milk, or dirt. Wash regularly with disinfectant or replace as needed. |
| Remove visible debris from teats | Ensures disinfectant is applied directly on teat skin for effectiveness. | Use a clean, dry towel or gloved hand to wipe off debris. Avoid using water, which can spread dirt to the teat end. |
| Apply teat disinfectant (pre-dip) | Kills bacteria on teat skin, reducing mastitis risk. | Apply disinfectant to every teat, ensuring full coverage and adequate contact time as per product instructions. |
| Fore-strip | Removes initial milk streams that are high in bacteria and somatic cells; allows detection of abnormal milk; stimulates milk let down. | Squirt 3–4 streams from each teat. Fore-strip onto the floor, never on gloves. Check for clots or discoloration. Report and discard abnormal milk. |
| Dry teats thoroughly | Removes dirt and disinfectant residue; prevents liner slips. | Use one clean, dry towel per cow. Employ a twisting downward motion, focusing on the teat-end cleanliness. |
| Automatic scrubber (if used) | Combines cleaning, disinfecting, and drying in one step. | Pass the brush over each teat twice—first to apply disinfectant, then to dry. Rinse scrubber after each group. |
| Attach and align the milking unit | Ensures complete and even milking; prevents liner slips. | Attach the unit 60–120 seconds after stimulation. Place it squarely under the udder with the milk hose parallel to the floor. Adjust as needed. |
| Timely detach milking unit | Avoids “under-milking” when all the available milk is not removed and “over-milking” when there is low milk flow, high mouthpiece chamber vacuum and teat congestion. | Most milking systems use automatic take-offs (ATO). If units are removed manually, remove them promptly after no milk flow is observed in 3 quarters. |
| Apply teat disinfectant (post-dip) | Kills bacteria on teat skin reducing mastitis risk; covers the thin milk film left after milking; conditions teat skin. | Apply disinfectant to every teat, ensuring full coverage. Allow cows to eat and drink post-milking to keep them standing while the teat canal closes fully. |
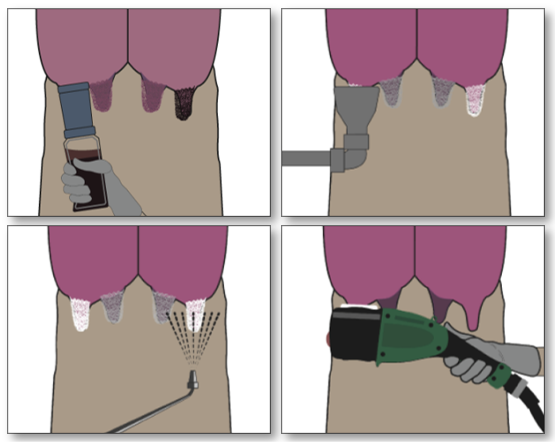
There are various methods and tools that can be used for teat disinfection to eliminate bacteria present on the teat skin. The illustration (Figure 1) shows some methods, for example dip cups, foamers, sprayers, and automatic scrubbers. Regardless of the method used, the key is to ensure complete coverage of each teat and to follow the product label instructions for the recommended contact time. This refers to how long the disinfectant must remain on the skin to be effective.
The Power of Consistency in the Parlor
Even the best milking routine is ineffective if it is not followed consistently. A successful milking routine requires everyone to perform the same steps, at the same pace, for every cow, during every milking session. To maintain consistency and effectiveness:
- Offer regular training sessions for all parlor personnel (new and experienced).
- Post the written step-by-step milking routine in the parlor for easy reference.
- Monitor adherence to the routine and retrain staff as necessary.
- Set milk quality goals and share key performance indicators (KPIs) like somatic cell counts and mastitis cases with team members to encourage collective efforts.
If your farm doesn’t have a written Standard Operating Procedure (SOP) for milking, now is an excellent time to create one with the assistance of your milk quality advisor or the University of Wisconsin-Extension Dairy Specialist.
Milking with Purpose: Every Step Matters
When dairy personnel understand not just what to do in the milking routine, but why each step matters, they become more than workers—they become stewards of milk quality. Even the best milking routine is ineffective if it’s not followed consistently. That’s why it’s essential to remind your milking team members that milk quality is in their hands, and that every person on the farm has the power to make a difference—with every cow, every milking, every day. Put your hands on the udder—and make every step count.
Authors

Carolina Pinzón-Sánchez
Bilingual Dairy Outreach Specialist – As a statewide Dairy Outreach Specialist, Carolina identifies needs and incorporates research findings into high-quality outreach education programs around dairy production.
References
- The seven habits of highly successful milking routines. Pamela Ruegg, Morten Dam Rasmusen and Douglas Reinemann. 2000.
The University of Wisconsin–Madison Division of Extension provides equal opportunities in employment and programming in compliance with state and federal law.